To repair ceiling tiles with water damage, first identify and fix the source of the water. Then, remove and replace the damaged tiles.
Water damage to ceiling tiles can be a common issue in homes and commercial buildings. Whether it’s due to a leaking roof, burst pipe, or condensation, addressing the problem promptly is crucial to prevent further damage and mold growth. We’ll explore practical steps to repair ceiling tiles with water damage, ensuring a safe and aesthetically pleasing environment.
From assessing the extent of the damage to executing the repair process, we’ll provide a comprehensive guide to help you restore your ceiling to its former condition.
Credit: restorationmasterfinder.com
Identifying Water Damage On Ceiling Tiles
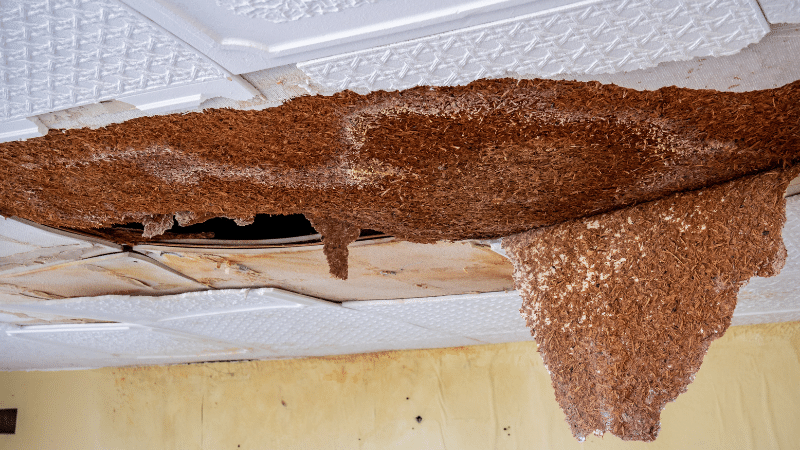
Ceiling tiles with water damage can be identified by discoloration, sagging, or mold growth. To repair, first locate and fix the source of the leak, then replace the damaged tiles with new ones to prevent further issues. Regularly inspecting and maintaining the ceiling can help prevent water damage in the future.
Ceiling tiles are vulnerable to water damage, especially in areas with high humidity or prone to flooding. Identifying water damage on ceiling tiles is crucial to prevent further damage and costly repairs. Signs of water damage, such as stains, discoloration, and sagging, are the first indicators that there may be a problem. Assessing the extent of the damage is also important to determine the appropriate repair method. In this article, we will discuss how to identify water damage on ceiling tiles and assess the extent of the damage.
Signs Of Water Damage
Water damage on ceiling tiles can manifest in different ways. The following are some of the signs of water damage that you should look out for:
- Stains: Water stains on ceiling tiles are a common sign of water damage. These stains may appear brown, yellow, or gray, and can be circular or irregular in shape.
- Discoloration: Water damage can cause ceiling tiles to become discolored, either by turning yellow, brown, or gray.
- Sagging: When ceiling tiles absorb water, they can start to sag or warp. This can lead to bulges or cracks in the tiles, making them more susceptible to further damage.
- Mold or mildew growth: If you notice mold or mildew growing on your ceiling tiles, it is a sign of water damage. These fungi thrive in moist environments and can spread quickly, causing health problems.
- Odor: A musty smell in the room can indicate water damage on ceiling tiles. This is caused by the growth of mold and mildew, and should be addressed immediately.
Assessing The Extent Of The Damage
Once you have identified signs of water damage on your ceiling tiles, you need to assess the extent of the damage. This will help you determine the appropriate repair method. The following are some of the ways to assess the extent of the damage:
- Check for leaks: Identify the source of the water damage and fix any leaks or water intrusion problems.
- Inspect the tiles: Check the tiles for signs of damage, such as cracks or bulges. If the damage is minor, you may be able to repair the tiles. However, if the damage is extensive, you may need to replace the tiles.
- Check the insulation: Inspect the insulation above the ceiling tiles for signs of water damage. Wet insulation can cause more damage to the ceiling tiles and should be replaced.
- Assess the structural damage: If the water damage has affected the structure of the building, it may require more extensive repairs.
In conclusion, identifying water damage on ceiling tiles is crucial to prevent further damage and costly repairs. Signs of water damage, such as stains, discoloration, sagging, mold or mildew growth, and odor, are the first indicators that there may be a problem. Assessing the extent of the damage will help you determine the appropriate repair method.
Safety Precautions Before Repair Work
When it comes to repairing ceiling tiles with water damage, it is essential to prioritize safety precautions before starting the repair work. By taking the necessary steps to protect yourself and secure the work area, you can ensure a safe and efficient repair process. Here are the key safety measures to follow:
Protective Gear And Tools
Before starting any repair work, it is crucial to gather the necessary protective gear and tools. This will help minimize the risk of injury and ensure that you have everything you need to complete the repairs effectively. Here are the essential protective gear and tools:
- Safety goggles
- Dust mask or respirator
- Gloves
- Hard hat
- Knee pads
- Utility knife or saw
- Measuring tape
- Putty knife
- Screwdriver
- Paintbrush
Securing The Work Area
Before you begin repairing the ceiling tiles, it is essential to secure the work area to prevent accidents and ensure a smooth repair process. Here are the steps to secure the work area:
- Clear the area beneath the damaged ceiling tiles of any furniture or objects that could obstruct your movement.
- Use plastic sheets or drop cloths to cover the floor and nearby furniture to protect them from dust, debris, and any potential water leakage.
- Turn off the power supply to the affected area to avoid any electrical hazards. If necessary, use a circuit breaker or turn off the main power switch.
- Place caution signs or barricades to alert others and prevent them from entering the work area during the repair process.
- Ensure proper lighting in the work area to have clear visibility while working on the ceiling tiles.
By following these safety precautions, you can minimize the risk of accidents and injuries during the repair work. Always prioritize your safety and take the necessary steps to create a secure work environment. Once you have secured the work area and gathered the required protective gear and tools, you can proceed with repairing the ceiling tiles damaged by water.
Removing Damaged Ceiling Tiles
Repair water-damaged ceiling tiles by removing and replacing them carefully. Start by assessing the extent of the damage and removing any wet or sagging tiles. Replace with new tiles for a fresh and restored ceiling appearance.
Removing Damaged Ceiling Tiles
When it comes to repairing water-damaged ceiling tiles, one crucial step is removing the damaged tiles. This process is essential to prevent further damage and restore the aesthetic appeal of your ceiling. In this section, we will guide you through the step-by-step removal process, along with the tools needed for the job.
Tools Needed For Removal
To effectively remove damaged ceiling tiles, you will need the following tools:
- Dust mask or respirator: Protect yourself from any dust or debris that may be released during the removal process.
- Gloves: Ensure your hands are protected from any sharp edges or potential hazards.
- Ladder or step stool: Depending on the height of your ceiling, you will need a safe and sturdy platform to reach the tiles.
- Putty knife or scraper: Use this tool to gently pry the damaged tiles away from the ceiling.
- Plastic sheeting or drop cloth: Lay down this protective covering to catch any falling debris and make clean-up easier.
- Trash bags: Dispose of the damaged tiles properly to maintain a clean workspace.
Step-by-step Removal Process
Now that you have gathered the necessary tools, let’s walk through the step-by-step removal process:
- Prepare the workspace: Place the plastic sheeting or drop cloth beneath the area where you will be working to catch any falling debris.
- Put on your protective gear: Wear a dust mask or respirator to avoid inhaling any dust particles, and put on gloves to protect your hands.
- Position the ladder or step stool: Ensure it is stable and secure before climbing up to reach the ceiling tiles.
- Identify the damaged tiles: Inspect the ceiling and locate the tiles that have been affected by water damage.
- Start removing the tiles: Gently insert the putty knife or scraper between the damaged tile and the surrounding tiles. Apply light pressure to pry the damaged tile away from the ceiling.
- Continue removing the tiles: Work your way around the damaged area, carefully removing each tile one by one. Take your time to avoid causing any additional damage.
- Dispose of the damaged tiles: Place the removed tiles into a trash bag, ensuring they are properly contained and won’t create a mess.
- Inspect the underlying structure: Once all the damaged tiles have been removed, examine the ceiling for any signs of further damage or moisture. It is crucial to address these issues before installing new tiles.
By following these steps and using the right tools, you can successfully remove water-damaged ceiling tiles. Remember to prioritize safety and take your time during the removal process to minimize the risk of causing additional damage.
Preparing For Ceiling Tile Replacement
Prepare for ceiling tile replacement due to water damage by removing damaged tiles, assessing underlying issues, and ensuring proper ventilation. Replace with new tiles, paint if needed, and address any leaks to prevent future damage. Prioritize timely repairs to maintain a safe and aesthetically pleasing environment.
Before replacing ceiling tiles with water damage, it’s crucial to prepare the area for the restoration process. This involves cleaning the framework, measuring and cutting new tiles, and ensuring all necessary tools are readily available.
Cleaning The Framework
To begin, clear the area around the damaged ceiling tiles. Use a damp cloth to remove any dirt or debris from the framework. Check for signs of mold or mildew, and if present, use a mild detergent solution to clean the affected areas. Allow the framework to dry completely before proceeding with the replacement.
Measuring And Cutting New Tiles
Carefully measure the dimensions of the damaged ceiling tiles to ensure accurate replacement. Use a tape measure to record the length and width of the tiles, and transfer these measurements to the new tiles. When cutting the new tiles, utilize a sharp utility knife for precision. Double-check the measurements before making any cuts to avoid errors.
By following these steps, you can effectively prepare for the replacement of ceiling tiles with water damage, ensuring a smooth and successful restoration process.
Installing New Ceiling Tiles
Installing new ceiling tiles is a straightforward process that can help restore the beauty of your damaged ceiling. Whether you’re dealing with water stains or structural damage, replacing the affected tiles is essential to maintaining the integrity of your ceiling. Here’s a step-by-step guide to fitting new ceiling tiles and adding the finishing touches to complete the repair.
Fitting Tiles Into Place
When installing new ceiling tiles, it’s crucial to ensure a proper fit for a seamless appearance. Begin by carefully measuring the dimensions of the damaged area to determine the size of the replacement tiles needed. Use a sharp utility knife to cut the new tiles to the correct dimensions, taking care to make precise cuts for a professional finish.
Finishing Touches
Once the new tiles are securely in place, it’s time to add the finishing touches to complete the repair. Apply a coat of primer to the entire ceiling to ensure a uniform appearance and to seal the new tiles in place. Use a high-quality paint to match the color of the existing ceiling, ensuring a seamless blend between the old and new tiles. Lastly, inspect the repaired area to ensure that the new tiles are flush with the surrounding ones, providing a smooth and cohesive look.
Preventing Future Water Damage
Preventing future water damage is crucial to maintaining the integrity of your ceiling tiles and avoiding costly repairs. By following these regular maintenance tips and exploring waterproofing solutions, you can ensure the longevity of your ceiling and protect it from any potential water damage.
Regular Maintenance Tips
Regular maintenance plays a vital role in preventing water damage to your ceiling tiles. Here are some essential tips to keep in mind:
- Inspect your ceiling regularly for any signs of water leaks or damage.
- Address any plumbing issues promptly to prevent water from seeping into your ceiling.
- Keep an eye out for condensation in your home, as it can lead to moisture buildup on the ceiling.
- Clean your gutters and downspouts regularly to ensure proper drainage and prevent water from overflowing onto your roof.
- Ensure that your attic is properly insulated and ventilated to minimize the risk of moisture accumulation.
Waterproofing Solutions
Implementing waterproofing solutions can add an extra layer of protection to your ceiling tiles. Consider the following options:
- Apply a water-resistant sealant or paint to your ceiling tiles to create a barrier against moisture.
- Install a vapor barrier beneath your ceiling tiles to prevent water vapor from seeping through.
- Consider using waterproof ceiling tiles that are specifically designed to withstand moisture.
- Ensure that your roof is properly maintained, including regular inspections and repairs to prevent any water leakage.
By regularly maintaining your ceiling and exploring waterproofing solutions, you can effectively prevent future water damage. Remember to stay vigilant, address any issues promptly, and consult with professionals if needed. Taking these proactive measures will help you protect your ceiling tiles and maintain a dry and secure living space.
Frequently Asked Questions
How To Identify Water Damage On Ceiling Tiles?
Inspect for discoloration, sagging, or mold spots on ceiling tiles.
Can I Repair Water-damaged Ceiling Tiles Myself?
Yes, you can repair minor water damage with proper guidance.
What Tools Do I Need To Repair Ceiling Tiles?
Gather materials like putty knife, paintbrush, primer, and replacement tiles.
How To Remove Water Stains From Ceiling Tiles?
Mix water and bleach, gently scrub the stain, and rinse.
Is It Necessary To Replace Water-damaged Ceiling Tiles?
Replace tiles if they are severely damaged or show mold growth.
How To Prevent Future Water Damage To Ceiling Tiles?
Fix leaks promptly, maintain ventilation, and inspect ceilings regularly.
Conclusion
To sum up, repairing ceiling tiles with water damage is a task that requires attention to detail and careful consideration. By following the steps outlined you can save time and money on costly repairs. Remember to identify the source of the water damage and take necessary precautions to prevent it from happening again.
With the right tools and techniques, you can easily restore your ceiling tiles to their former glory and maintain a beautiful home.