To paint bathroom tiles in a shower, clean the tiles thoroughly and apply a high-quality primer before painting with waterproof, epoxy-based paint. This will ensure a durable and long-lasting finish that can withstand the moisture and humidity of a shower environment.
Revamping the look of your bathroom can be as simple as giving your tiles a fresh coat of paint. Whether you want to update the color or cover up unsightly stains, painting your bathroom tiles can provide a cost-effective solution.
With the right preparation and materials, you can achieve a professional-looking result that rejuvenates your shower space. We’ll explore the step-by-step process for painting bathroom tiles in a shower, along with some useful tips to ensure a successful and lasting finish.
Introduction To Tile Painting
Transform your bathroom by painting tiles in the shower. Clean, prime, paint, and seal for a fresh look.
Painting bathroom tiles in a shower can be a great way to refresh the look of your bathroom without breaking the bank. This DIY project can be a cost-effective alternative to replacing your tiles entirely. However, before you get started, it is important to understand the ins and outs of tile painting. In this blog post, we will discuss why you should choose paint over replacement, as well as the pros and cons of painting shower tiles.
Why Choose Paint Over Replacement
When it comes to refreshing your bathroom, replacing tiles can be an expensive and time-consuming process. Painting your shower tiles can be a much more affordable and efficient way to achieve a new look. In addition, painting your tiles gives you the freedom to choose any color or design you desire, without being limited to the options available in stores.
Pros And Cons Of Painting Shower Tiles
There are several advantages to painting shower tiles, including cost-effectiveness, the ability to customize the look, and the ease of the process. However, there are also some disadvantages to consider. For example, if the tiles are not properly prepared, the paint may not adhere correctly, leading to peeling or chipping. Additionally, painted tiles may not be as durable as their natural counterparts. It is important to weigh the pros and cons carefully before deciding if tile painting is the right choice for your bathroom renovation project.
In conclusion, tile painting can be a great option for those looking to update their bathroom on a budget. However, it is important to fully understand the process and potential drawbacks before getting started. By weighing the pros and cons and properly preparing the tiles, you can achieve a beautiful and long-lasting finish that will refresh the look of your bathroom for years to come.
Choosing The Right Paint
Revamp your bathroom by painting the tiles in the shower. Choose a high-quality, moisture-resistant paint for lasting results. Ensure tiles are clean and dry before applying primer and paint for a fresh new look.
When it comes to painting bathroom tiles in a shower, choosing the right paint is crucial for a successful and long-lasting outcome. The paint you select should be able to withstand the humid and wet environment of the bathroom, as well as the constant exposure to water and cleaning products. In this section, we will discuss the types of paint suitable for tiles and how to select the best color and finish for your shower tiles.
Types Of Paint Suitable For Tiles
When painting bathroom tiles in a shower, it’s important to use a paint specifically designed for tile surfaces. These types of paint are formulated to adhere to smooth and glossy surfaces like ceramic, porcelain, or glass tiles. Here are some types of paint suitable for tiles:
- Epoxy Paint: This type of paint is highly durable and water-resistant, making it ideal for shower tiles. It provides a smooth and glossy finish that can withstand frequent exposure to water and cleaning agents.
- Latex Paint: Latex paint is a popular choice for painting bathroom tiles. It is easy to apply, dries quickly, and offers good resistance to moisture. However, it may not be as durable as epoxy paint.
- Tile Paint: Specifically formulated for tile surfaces, tile paint provides excellent adhesion and durability. It is available in various colors and finishes and can give your shower tiles a fresh new look.
Selecting The Best Color And Finish
When selecting the color and finish for your shower tiles, there are a few factors to consider. The color should complement the overall aesthetic of your bathroom and create a cohesive look. Here are some tips for selecting the best color and finish:
- Neutral colors: Neutral colors like white, beige, or gray are versatile choices that can easily match any bathroom decor. They also create a clean and timeless look.
- Bold colors: If you want to make a statement, consider using bold and vibrant colors. Just make sure they harmonize with the rest of the bathroom design.
- High gloss finish: A high gloss finish can add a sleek and modern touch to your shower tiles. It is also easier to clean and maintain.
- Satin or matte finish: Satin or matte finishes are more forgiving when it comes to showing imperfections or water spots. They can provide a softer and more subtle look.
Remember to always test the paint color and finish on a small inconspicuous area of your shower tiles before proceeding with the full application. This will help you ensure that you are happy with the result and that the paint adheres properly to the surface.
Preparation For Painting
Before you start painting your bathroom tiles in the shower, it’s crucial to properly prepare the surface. This will ensure that the paint adheres well and provides a long-lasting finish. The preparation process involves two main steps: cleaning and repairing the tiles, and gathering the essential materials and tools.
Cleaning And Repairing The Tiles
To achieve a successful paint job, it’s important to clean the tiles thoroughly. Start by removing any dirt, grime, or soap scum using a suitable tile cleaner. Make sure to scrub the tiles well, paying attention to the grout lines as well. After cleaning, rinse the tiles with water and allow them to dry completely.
Next, inspect the tiles for any cracks, chips, or loose sections. These imperfections can affect the final result, so it’s essential to repair them before painting. Use a suitable tile filler or epoxy compound to fill in any gaps or cracks. Smooth out the filler using a putty knife and allow it to dry according to the manufacturer’s instructions.
Essential Materials And Tools
Now that the tiles are clean and repaired, it’s time to gather the necessary materials and tools for the painting process. Here’s a list of what you’ll need:
| Materials | Tools |
|---|---|
| – Tile primer | – Paintbrush or roller |
| – Tile paint | – Paint tray |
| – Painter’s tape | – Drop cloths or plastic sheets |
| – Clean cloth | – Sandpaper or sanding block |
| – Sponge or scrub brush | – Putty knife |
Make sure to choose tile paint and primer specifically designed for use in wet areas like showers. These products are moisture-resistant and will provide better durability. Additionally, select a paint color that complements your bathroom decor and personal style.
By following these preparation steps, you’ll be well on your way to achieving a beautifully painted shower with transformed bathroom tiles. Once the preparation is complete, you can move on to the next steps of the painting process, which we will cover in the upcoming sections of this blog post.
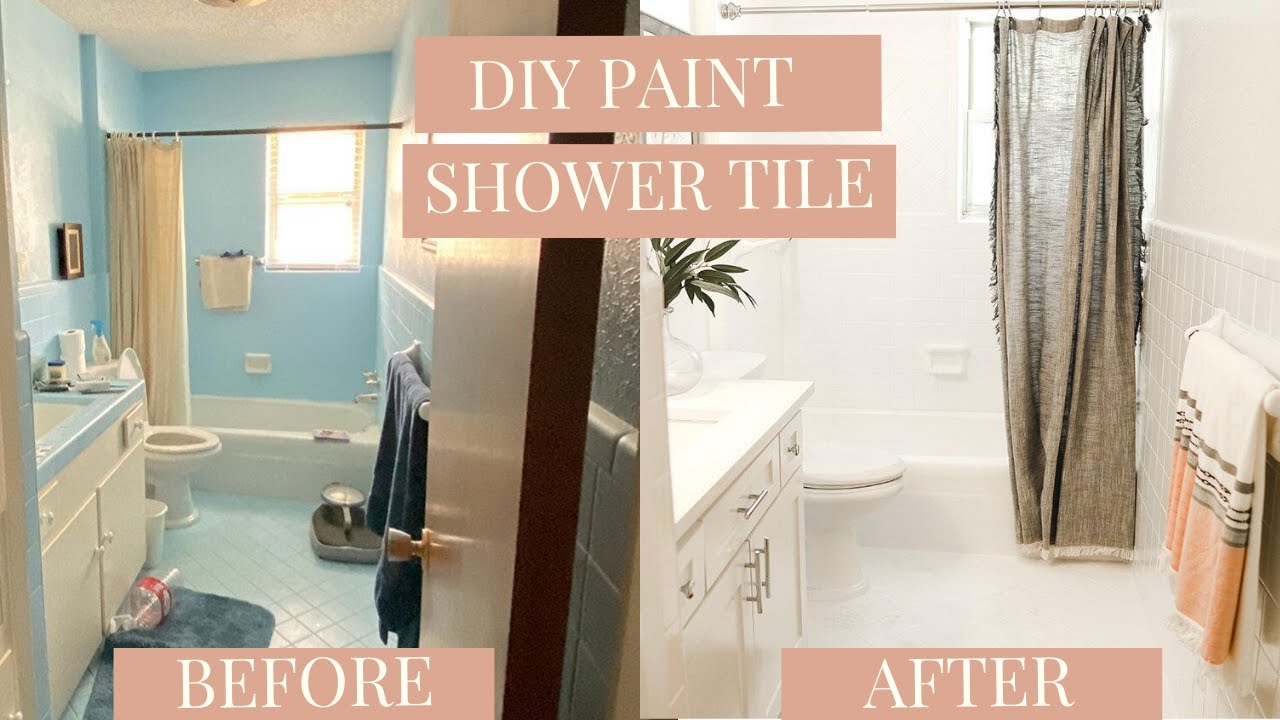
Credit: www.youtube.com
Step-by-step Painting Process
When it comes to updating the look of your bathroom, painting the tiles in the shower can make a significant impact. The step-by-step painting process involves applying primer for better adhesion, using techniques for smooth paint application, and sealing the painted tiles for durability.
Applying Primer For Better Adhesion
Before painting your bathroom tiles, it’s crucial to apply a high-quality bonding primer specifically designed for slick surfaces. Primer enhances adhesion and ensures the paint sticks to the tiles, preventing peeling and chipping.
Techniques For Smooth Paint Application
When it comes to painting bathroom tiles in a shower, smooth and even paint application is essential for a professional finish. Use a high-quality paintbrush or roller to apply the paint evenly, ensuring full coverage and a uniform appearance.
Drying And Curing
After painting bathroom tiles in a shower, the drying and curing process is crucial for ensuring a long-lasting and durable finish. Properly drying and curing the painted tiles will help to prevent any damage or imperfections, and will ultimately contribute to the overall success of the project.
Optimal Conditions For Drying
When it comes to drying the painted bathroom tiles, it’s important to create optimal conditions to facilitate the process. Ensure that the bathroom is well-ventilated with good airflow, as this will help the paint to dry evenly and efficiently. Additionally, maintaining a consistent room temperature between 70-85°F is ideal for promoting effective drying. Keep the bathroom well-lit, as natural or artificial light can aid in the drying process.
How To Speed Up The Curing Process
Speeding up the curing process can help to reduce the waiting time before the shower can be used. One way to accelerate curing is by using a space heater or fan to increase the air circulation and promote faster evaporation of moisture from the painted tiles. It’s important to ensure that the temperature doesn’t exceed the recommended range, as excessive heat can affect the quality of the finish. Additionally, using a dehumidifier can help to reduce the humidity levels in the bathroom, expediting the curing process.
Maintenance And Care
Proper maintenance and care are essential to ensure the longevity and durability of your painted bathroom tiles in the shower. By following a few simple daily cleaning tips and implementing long-term maintenance strategies, you can keep your painted tiles looking pristine for years to come.
Daily Cleaning Tips
To keep your painted bathroom tiles in the shower clean on a daily basis, consider the following tips:
- Regularly wipe down the tiles with a mild cleaner or soapy water to remove any soap scum, dirt, or grime that may accumulate.
- Avoid using abrasive cleaners or scrub brushes that can scratch or damage the painted surface.
- After each shower, use a squeegee or towel to remove excess water and prevent water spots.
- Ensure proper ventilation in the bathroom to minimize moisture buildup, as excessive moisture can lead to mold or mildew growth.
Long-term Maintenance For Painted Tiles
To maintain the appearance and integrity of your painted bathroom tiles in the shower over the long term, consider the following strategies:
- Reapply a protective sealant every few years to enhance the durability of the painted surface.
- Avoid using harsh chemicals or abrasive cleaners that can strip away the paint or cause discoloration.
- Inspect the tiles regularly for any signs of chipping or peeling. If necessary, touch up the affected areas with matching paint to maintain a seamless appearance.
- Consider using bathmats or rugs in high-traffic areas to protect the painted surface from excessive wear and tear.
By incorporating these daily cleaning tips and long-term maintenance strategies into your routine, you can ensure that your painted bathroom tiles in the shower remain beautiful and functional for years to come.
Frequently Asked Questions
How Long Does It Take To Paint Bathroom Tiles In A Shower?
It usually takes around 2 to 3 days to paint bathroom tiles in a shower, including drying time.
Can You Paint Over Old Bathroom Tiles In A Shower?
Yes, you can paint over old bathroom tiles in a shower with the proper preparation and paint.
What Kind Of Paint Do You Use For Bathroom Tiles In A Shower?
You should use a paint that is specifically formulated for bathroom tiles, such as epoxy or latex paint.
Do You Need To Prime Bathroom Tiles Before Painting Them In A Shower?
Yes, it is important to prime bathroom tiles before painting them in a shower to ensure proper adhesion and durability.
Can You Diy Paint Bathroom Tiles In A Shower Or Should You Hire A Professional?
You can DIY paint bathroom tiles in a shower, but it can be a time-consuming and tedious process. Hiring a professional can ensure a more even and long-lasting finish.
How Do You Maintain Painted Bathroom Tiles In A Shower?
To maintain painted bathroom tiles in a shower, avoid using harsh chemicals or abrasive cleaners, and clean them regularly with a mild cleaner and soft cloth.
Conclusion
Revamp your bathroom with a fresh look by painting the tiles in the shower. Follow the steps outlined to achieve a stylish and cost-effective transformation. Elevate your bathroom decor with a pop of color or a sleek monochrome finish. Get ready to enjoy your revitalized shower space!