
To cut tiles with a grinder, mark the cut line, put on safety gear, and carefully score the line. Then, use the grinder to cut along the scored line, ensuring a clean and precise cut.
Cutting tiles with a grinder is a common practice in tile installation and renovation projects. Grinders are versatile tools that can make straight and curved cuts in various tile materials such as ceramic, porcelain, and natural stone. When used correctly, grinders provide a quick and efficient way to achieve the desired tile shapes and sizes.
However, it’s essential to follow safety precautions and use the appropriate grinder blade for the specific type of tile being cut. We’ll explore the step-by-step process of cutting tiles with a grinder and provide useful tips for a successful outcome.
Introduction To Tile Cutting With A Grinder
Learn how to efficiently cut tiles using a grinder for precise and clean results. The grinder’s diamond blade ensures smooth cutting, making it a versatile tool for DIY tile projects. Mastering this technique can help you achieve professional-looking tile installations with ease.
The Popularity Of Diy Tile Projects
DIY tile projects have become increasingly popular among homeowners looking to add a personal touch to their spaces. Whether you’re renovating a bathroom, kitchen, or any other area, installing tiles can instantly transform the look and feel of the room. With the rise of online tutorials and step-by-step guides, more and more people are taking on tile installation projects themselves.
Why Choose A Grinder For Tile Cutting?
When it comes to cutting tiles, there are various tools available, but one that stands out for its efficiency and precision is a grinder. A grinder, also known as an angle grinder or disc grinder, is a versatile tool commonly used in construction and renovation projects. Its compact size and powerful motor make it ideal for cutting through different materials, including tiles.
So, why choose a grinder for tile cutting? Here are a few reasons:
- Efficiency: Grinders are designed to cut through tiles quickly and effortlessly, saving you time and effort compared to manual methods.
- Precision: With the right blade attached, grinders offer precise cutting, allowing you to achieve clean and accurate tile edges.
- Versatility: Grinders can be used for various tile cutting tasks, including straight cuts, curves, notches, and even removing small sections.
- Cost-effective: Investing in a grinder for your tile cutting needs can be cost-effective in the long run, as it eliminates the need to hire professionals for every tile cutting job.
Whether you’re a seasoned DIY enthusiast or a beginner looking to tackle your first tile project, using a grinder for tile cutting can make the process smoother and more efficient. In the following sections, we will explore the steps involved in cutting tiles with a grinder, as well as some tips and precautions to ensure a successful outcome.
Safety First: Preparing To Cut Tiles
Prepare for tile cutting with a grinder by prioritizing safety. Wear protective gear, mark the tile accurately, adjust the grinder settings, and secure the tile firmly. Keep a steady hand and let the grinder do the work for precise cutting results.
Cutting tiles with a grinder can be a dangerous task if proper safety measures are not taken. Before you start cutting the tiles, it’s essential to take some precautions to avoid any injuries. In this article, we will discuss the safety measures that you should take before cutting the tiles with a grinder.
Personal Protective Equipment
Personal Protective Equipment (PPE) is an essential component of any job that involves cutting or grinding. When it comes to cutting tiles with a grinder, PPE is crucial to ensure that you are safe from any potential hazards. Here is a list of PPE that you should wear before starting to cut the tiles with a grinder:
- Safety glasses or goggles
- Dust mask or respirator
- Earplugs or earmuffs
- Gloves
- Steel-toed boots
Setting Up A Safe Workspace
Apart from wearing PPE, it’s also crucial to set up a safe workspace to prevent any accidents. Here are some steps that you should follow to set up a safe workspace:
- Clean the workspace: Remove any debris or clutter from the workspace to prevent tripping hazards.
- Secure the tile: Use clamps to secure the tile firmly in place before cutting.
- Mark the tile: Use a pencil or marker to mark the tile where you want to make the cut.
- Clear the area: Make sure there are no flammable materials or liquids in the workspace.
- Position the grinder: Position the grinder in such a way that the sparks are directed away from you.
In conclusion, cutting tiles with a grinder can be a safe task if proper safety measures are taken. Wearing the right PPE and setting up a safe workspace are crucial to ensure that you are protected from any potential hazards. By following these steps, you can cut the tiles with a grinder without worrying about any injuries.
Choosing The Right Grinder And Blade
Selecting the appropriate grinder and blade is crucial for cutting tiles effectively. Ensure compatibility and quality to achieve precise and clean tile cuts. Proper equipment choice enhances the efficiency and accuracy of tile cutting projects.
Choosing the Right Grinder and Blade
When it comes to cutting tiles with a grinder, selecting the right grinder and blade is crucial. The grinder and blade you choose will determine the quality of the cut and the overall success of your tile cutting project. In this section, we will explore the types of grinders suitable for tile cutting and how to select the best blade for your specific tile type.
Types Of Grinders Suitable For Tile Cutting
There are several types of grinders that can be used for cutting tiles, but not all of them are suitable for this task. Here are the grinders commonly used for cutting tiles:
1. Angle Grinder: An angle grinder is a versatile tool that can be used for various cutting tasks, including cutting tiles. It is handheld and features a rotating disc that can be fitted with different types of blades.
2. Wet Tile Saw: A wet tile saw is specifically designed for cutting tiles. It uses water to cool the blade and reduce dust, resulting in cleaner cuts. Wet tile saws are ideal for cutting large tiles or making precise cuts.
3. Rotary Tool: A rotary tool, such as a Dremel, can also be used for cutting tiles. It is a handheld tool that uses a small, rotating disc. Rotary tools are best suited for small cutting jobs or making intricate cuts.
Selecting The Best Blade For Your Tile Type
Choosing the right blade for your tile type is essential to achieve clean and precise cuts. Here are some factors to consider when selecting a blade:
1. Blade Material: The material of the blade should be compatible with the type of tile you are cutting. For example, a diamond blade is suitable for cutting ceramic or porcelain tiles, while a carbide-tipped blade is better for cutting natural stone tiles.
2. Blade Size: The size of the blade should match the size of the tiles you are cutting. Using a blade that is too small may result in incomplete cuts, while using a blade that is too large can be difficult to control.
3. Blade Quality: Investing in a high-quality blade can make a significant difference in the cutting performance. A well-made blade will last longer, provide cleaner cuts, and reduce the risk of chipping or damaging the tile.
4. Blade Design: Different blade designs are available for specific cutting tasks. For straight cuts, a continuous rim blade is suitable, while a segmented rim blade is better for curved or angular cuts.
Remember, always follow the manufacturer’s instructions for the specific grinder and blade you are using. Take the necessary safety precautions, such as wearing protective eyewear and gloves, and ensure the work area is well-ventilated.
By choosing the right grinder and blade for your tile cutting project, you can achieve professional-looking results with ease.
Credit: www.homedepot.com
Step-by-step Guide To Cutting Tiles
Cutting tiles with a grinder is a skill that can be incredibly useful for any DIY enthusiast or professional tiler. Whether you’re working on a kitchen backsplash, bathroom floor, or any other tiling project, mastering the art of cutting tiles with a grinder can make a significant difference in the outcome of your project. In this step-by-step guide, we will walk you through the process of cutting tiles with a grinder, from marking the tile for precision to the actual cutting process.
Marking The Tile For Precision
Before you begin cutting the tile, it’s essential to mark it accurately to ensure a precise cut. Start by measuring the area where the tile needs to fit and then transfer those measurements onto the tile’s surface. Use a straight edge or a square to draw a clear cutting line on the tile. This step is crucial in ensuring that your tile will fit perfectly in its intended place.
Securing The Tile Before Cutting
Once the tile is marked, it’s important to secure it in place before cutting. You can use clamps or a non-slip mat to hold the tile firmly on your work surface. This will prevent the tile from shifting during the cutting process, resulting in a cleaner and more precise cut.
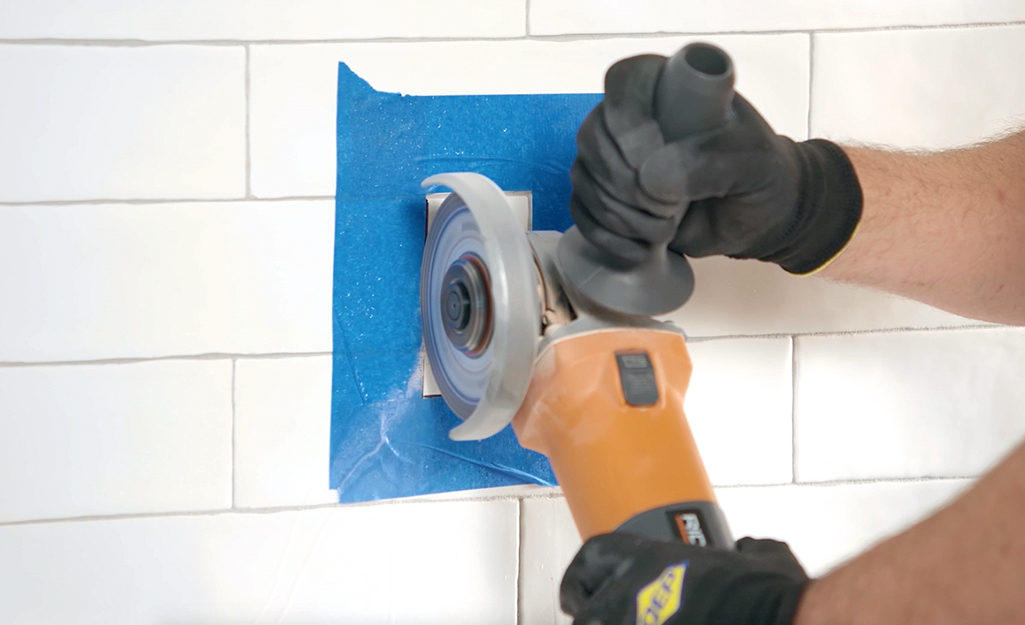
The Actual Cutting Process
Now that the tile is securely in place, it’s time to start the cutting process. Put on your safety goggles and gloves before turning on the grinder. Hold the grinder firmly with both hands and slowly guide it along the marked cutting line. Let the grinder do the work, and avoid applying excessive pressure as this can lead to chipping or cracking of the tile. Once the cut is complete, carefully remove the excess tile and smooth any rough edges with a tile file or sandpaper.
Tips For Smooth And Precise Cuts
Managing Grinder Speed And Pressure
Adjusting the speed and pressure of the grinder is crucial for achieving smooth and precise cuts. Maintain a consistent speed and apply gentle, even pressure to prevent chipping and ensure a clean cut.
Dealing With Challenging Cuts
When faced with challenging cuts, such as intricate shapes or hard materials, it’s essential to approach the task with patience and precision. Use a steady hand and make gradual adjustments to the grinder’s speed and pressure to tackle difficult cuts effectively.
Post-cutting Procedures
Once you have successfully cut your tiles with a grinder, there are a few important post-cutting procedures that you should follow to ensure a clean and professional finish. These procedures involve cleaning and smoothing the edges of the tiles, as well as proper maintenance of the grinder after use.
Cleaning And Smoothing The Edges
After cutting the tiles, it is essential to clean and smooth the edges to achieve a polished and professional look. Follow these steps to clean and smooth the edges:
- Start by removing any loose debris or dust from the edges of the cut tiles using a soft brush or cloth.
- Next, use a tile file or sandpaper to gently smooth out any rough edges. Hold the file or sandpaper at a slight angle and move it in a circular motion along the edge of the tile to remove any sharp or uneven areas.
- Continue filing or sanding until the edges are smooth to the touch. Be careful not to apply too much pressure, as this may cause damage to the tile.
- Once the edges are smooth, wipe the tiles with a damp cloth to remove any remaining dust or debris.
Maintenance Of The Grinder After Use
Proper maintenance of the grinder is crucial to ensure its longevity and efficient performance. Here are some steps to follow for maintaining your grinder after use:
- Disconnect the grinder from the power source and allow it to cool down completely.
- Use a brush or cloth to remove any excess dust or debris from the grinder.
- Carefully inspect the grinding wheel for any signs of wear or damage. If necessary, replace the wheel following the manufacturer’s instructions.
- Check the grinder’s motor and other components for any loose or damaged parts. Tighten or repair as needed.
- Apply a small amount of lubricant to the moving parts of the grinder, following the manufacturer’s recommendations.
- Store the grinder in a clean and dry place, away from moisture and dust.
By following these post-cutting procedures, you can ensure that your tiles have clean and smooth edges, and your grinder remains in optimal condition for future use.
Frequently Asked Questions
How Do You Cut Tiles With A Grinder?
To cut tiles with a grinder, mark the cut line, wear safety gear, and slowly score the tile.
What Type Of Grinder Is Best For Cutting Tiles?
A diamond blade grinder is best for cutting tiles due to its precision and durability.
Can You Cut Porcelain Tiles With A Grinder?
Yes, a grinder with a diamond blade can cut porcelain tiles effectively and accurately.
How To Prevent Chipping While Cutting Tiles?
To prevent chipping, use a fine diamond blade, cut slowly, and apply masking tape.
Should I Wear Safety Gear When Cutting Tiles?
Absolutely! Wear safety goggles, a mask, and gloves to protect yourself while cutting tiles.
Can A Grinder Be Used For Curved Tile Cuts?
Yes, a grinder with a diamond blade can be used for making curved tile cuts smoothly.
Conclusion
Cutting tiles with a grinder requires patience, precision, and safety precautions. By following the steps outlined in this guide, you can achieve professional-looking cuts on a variety of tile materials. Remember to wear protective gear, use a diamond blade, and take breaks when necessary to avoid fatigue.
With practice, you can become proficient in using a grinder for tile cutting and take on more complex projects. Keep these tips in mind and enjoy the satisfaction of a job well done.