
To remove vinyl floor tiles from concrete, start by heating the tiles with a hairdryer to soften the adhesive. Then, use a putty knife to pry up the tiles and a scraper to remove any remaining adhesive residue.
Removing vinyl floor tiles from concrete can be a straightforward process when following the right steps. Whether you’re renovating your home or updating a commercial space, knowing how to effectively remove vinyl floor tiles from concrete will help you achieve a clean and smooth surface for your new flooring installation.
This guide will provide you with clear and practical steps to ensure that the tile removal process is efficient and hassle-free. By following these instructions, you’ll be able to prepare the concrete for new flooring without unnecessary complications.
Credit: www.youtube.com
Introduction To Vinyl Tile Removal
Remove vinyl floor tiles from concrete by starting at a corner with a putty knife. Lift tiles carefully to avoid damaging the subfloor. Use a heat gun or hairdryer to soften adhesive for easier removal. Clean the concrete surface after all tiles are removed.
Removing vinyl floor tiles from concrete is a messy and time-consuming job, but it’s a task that anyone can do with the right tools and a little bit of patience. Vinyl tiles are a popular choice for flooring due to their durability, affordability, and low maintenance requirements. However, when it comes to removing them, it can be a daunting task, especially if you don’t know where to start. In this blog post, we’ll provide you with a step-by-step guide on how to remove vinyl floor tiles from concrete, starting with safety considerations, tools, and materials needed.
Safety Considerations
Before you start removing vinyl floor tiles, it is important to take the necessary safety precautions. Here are some safety considerations to keep in mind:
- Wear safety goggles to protect your eyes from flying debris.
- Wear a dust mask to prevent inhaling dust and debris.
- Wear gloves to protect your hands from sharp edges and potential exposure to chemicals.
- Wear knee pads or a cushioned mat to protect your knees from the hard concrete floor.
- Keep the work area well-ventilated to prevent the buildup of toxic fumes.
- Never use heat to remove vinyl tiles, as this can release toxic fumes.
Tools And Materials Needed
To remove vinyl floor tiles from concrete, you will need the following tools and materials:
| Tools | Materials |
|---|---|
|
|
With these tools and materials, you’ll be able to remove vinyl floor tiles from concrete with ease. In the next section, we’ll go over the step-by-step process of removing vinyl tiles from concrete.
Preparing The Work Area
Before you begin the process of removing vinyl floor tiles from concrete, it is crucial to properly prepare the work area. Taking the necessary precautions will not only make the task easier but also minimize any potential damage to the surrounding surfaces. In this section, we will guide you through the important steps to follow for preparing the work area.
Clearing The Room
Start by clearing the room of any furniture, appliances, or other items that may obstruct your access to the floor. This will provide you with a clear and unobstructed workspace, allowing you to navigate around more efficiently during the removal process. Additionally, removing any objects from the room will help protect them from any potential damage.
Protecting Surrounding Surfaces
When removing vinyl floor tiles from concrete, it is essential to take precautions to protect the surrounding surfaces. The process of removing the tiles can be quite vigorous, and you don’t want to inadvertently damage any adjacent walls, baseboards, or fixtures. To prevent any unwanted scratches or dents, consider the following steps:
- Cover the baseboards and walls with painter’s tape or protective plastic sheeting to create a barrier.
- Use drop cloths or old bedsheets to cover any nearby furniture or appliances that couldn’t be removed from the room.
- Consider placing cardboard or thick plastic sheets on the floor adjacent to the area you’ll be working on. This will protect the concrete from any accidental damage caused by tools or debris.
By taking these precautions, you can ensure that the removal process goes smoothly without causing any unnecessary harm to the surrounding surfaces.
Starting The Removal Process
To start the removal process of vinyl floor tiles from concrete, begin by heating the tiles with a heat gun to loosen the adhesive. Then, carefully pry up the tiles using a putty knife, starting from a corner. Repeat until all tiles are removed.
Identifying A Starting Point
Before you begin removing vinyl floor tiles from concrete, it’s important to identify a starting point. This will help you approach the removal process systematically and efficiently. Start by examining the area and looking for a loose or damaged tile. This can serve as your starting point as it will be easier to remove compared to the intact tiles. If you can’t find a loose tile, you can select any tile near a corner or an edge to start with. Once you’ve identified the starting point, you’re ready to move on to the next step.
Heating The Tiles
Heating the vinyl floor tiles is an effective technique to loosen the adhesive and make the removal process easier. You can use a heat gun or a hairdryer on its highest heat setting. Hold the heat source about six inches away from the tile and move it in a circular motion. Be careful not to overheat the tile, as it may cause damage to the concrete. Heating the tile for about 30 seconds should be sufficient to soften the adhesive.
If you don’t have a heat gun or hairdryer, you can also use a hot water-filled kettle or boiling water poured directly onto the tile. This method may take longer, but it can still help to loosen the adhesive.
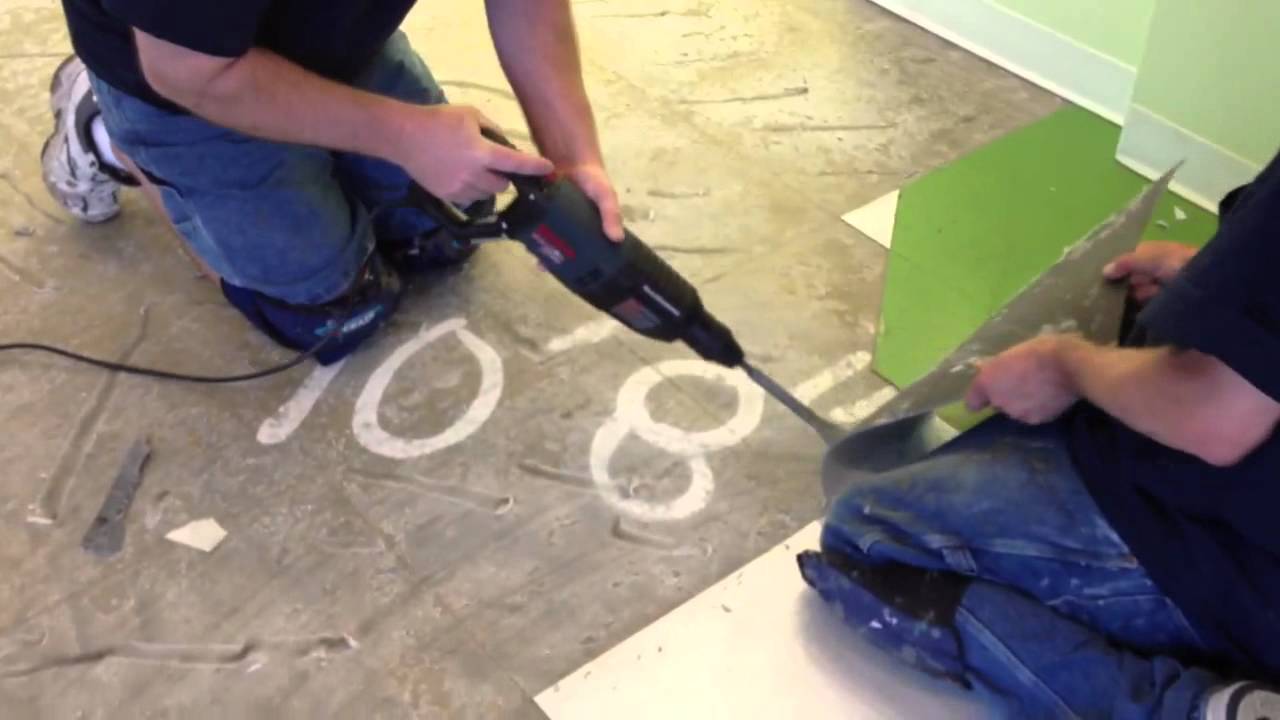
Removing The Tiles
Once the adhesive is softened, you can start removing the vinyl floor tiles. Use a putty knife or a floor scraper to carefully pry up the tile from the starting point. Position the tool at a slight angle and apply gentle pressure to lift the tile. If the tile doesn’t come off easily, you can use a mallet or a hammer with a tapping motion to break it into smaller pieces for easier removal. Remember to wear safety goggles and gloves during this process to protect yourself from any potential injuries.
Continue the removal process by repeating the steps for each tile. Work in small sections, focusing on one tile at a time. This will help you maintain control and prevent any damage to the concrete floor. Once you have removed all the tiles, you can proceed with cleaning the remaining adhesive residue and preparing the concrete for any new flooring installation.
Summary:
Starting the removal process for vinyl floor tiles involves identifying a starting point and heating the tiles to loosen the adhesive. Once the adhesive is softened, you can carefully remove the tiles using a putty knife or floor scraper. Work in small sections and repeat the steps for each tile until you have removed all of them. Remember to take safety precautions and protect yourself during the removal process.
Techniques For Lifting Tiles
When removing vinyl floor tiles from concrete, it’s crucial to employ effective techniques for lifting the tiles without damaging the underlying surface. The right approach can make the process easier and prevent potential issues. Here are some tried-and-tested methods for lifting vinyl floor tiles from concrete.
Using A Floor Scraper
A floor scraper is an efficient tool for lifting vinyl floor tiles from concrete. It features a sharp blade that can be angled to slide underneath the tiles, loosening them from the adhesive. Begin at a corner of the tile and gently pry it up with the floor scraper. Move the scraper beneath the tile, using steady and controlled force to lift it without causing damage to the concrete surface. Repeat this process for each tile until they are all removed.
Employing A Putty Knife
A putty knife can also be used to lift vinyl floor tiles from concrete. Slide the thin edge of the putty knife beneath the edge of a tile and gently lift it upward. Work methodically across the tile, gradually loosening and lifting it from the concrete surface. Take care to avoid applying excessive force, as this can result in damage to the concrete. Once the tiles are loosened, carefully pry them up using the putty knife.
Handling Adhesive Residue
When removing vinyl floor tiles from concrete, handling adhesive residue is a crucial step. Adhesive residue can be stubborn and difficult to remove, but with the right approach, it can be effectively tackled. Here’s how to handle adhesive residue during the vinyl floor tile removal process.
Applying Adhesive Remover
The first step in handling adhesive residue is applying a high-quality adhesive remover. Choose a remover designed for the specific type of adhesive used for the vinyl floor tiles. Follow the manufacturer’s instructions for application and ensure that the remover thoroughly saturates the adhesive residue.
Scrubbing And Cleaning
After allowing the adhesive remover to penetrate the residue, use a scrub brush or abrasive pad to gently scrub the area. This will help to loosen the adhesive and make it easier to remove. Once the adhesive has been loosened, thoroughly clean the area using a solution of warm water and mild detergent. This will help to remove any remaining residue and prepare the concrete surface for the next steps in the removal process.
Finishing Up
As you near the end of your vinyl floor tile removal project, there are a few important steps to consider. From disposing of the old tiles to prepping the concrete for new flooring, these final tasks will help ensure a smooth and successful transition.
Disposal Of Old Tiles
Properly disposing of the old vinyl floor tiles is essential for maintaining a clean and safe working environment. Follow these steps to dispose of the tiles responsibly:
- Collect the removed tiles and place them in a sturdy garbage bag.
- Seal the bag tightly to prevent any dust or debris from escaping.
- If possible, check with your local waste management facility for specific instructions on recycling or disposing of vinyl materials.
- Dispose of the bagged tiles according to the guidelines provided by your local waste management authority.
Prepping Concrete For New Flooring
Once the old vinyl floor tiles have been removed, it’s important to properly prepare the concrete surface for the installation of new flooring. Follow these steps to ensure a suitable base:
- Thoroughly clean the concrete surface, removing any remaining adhesive or debris.
- Inspect the concrete for any cracks or uneven areas. Fill in any cracks and level out uneven spots using a suitable concrete patching compound.
- Allow the concrete patching compound to dry and cure completely according to the manufacturer’s instructions.
- Sand down any rough or uneven patches to create a smooth surface for the new flooring.
- Vacuum or sweep the area to remove any dust or particles that could interfere with the adhesion of the new flooring.
By properly disposing of the old vinyl floor tiles and prepping the concrete surface, you are now ready to move forward with installing your new flooring. Whether you choose to lay down another type of vinyl floor or explore alternative flooring options, these final steps ensure a solid foundation for your renovation project.
Frequently Asked Questions
How Do You Remove Vinyl Floor Tiles From Concrete?
To remove vinyl floor tiles from concrete, use a scraper to loosen the tiles, then pry them up. Scrape off the adhesive residue.
Can You Remove Vinyl Tiles Without Damaging Concrete?
Yes, you can remove vinyl tiles without damaging the concrete if you use the right tools and techniques. Be gentle and patient.
What Tools Do I Need To Remove Vinyl Tiles From Concrete?
To remove vinyl tiles from concrete, you will need a scraper, pry bar, putty knife, heat gun, and adhesive remover.
How Long Does It Take To Remove Vinyl Tiles From Concrete?
The time it takes to remove vinyl tiles from concrete depends on the size of the area and the tools you are using. It could take a few hours or a few days.
How Do I Get Rid Of The Adhesive Residue After Removing Vinyl Tiles?
To get rid of adhesive residue after removing vinyl tiles, use an adhesive remover, scraper, and hot water. Repeat as necessary.
Can I Install New Flooring Over The Concrete After Removing Vinyl Tiles?
Yes, you can install new flooring over the concrete after removing vinyl tiles. Make sure the surface is clean and level before installation.
Conclusion
Removing vinyl floor tiles from concrete requires patience and the right tools. By following the step-by-step guide outlined in this blog post, you can effectively tackle this task. Remember to prioritize safety and take your time to ensure a successful tile removal process.
Good luck with your project!